Part 1: Download Files
- This project will require three files: the main source code (stereoloop.c), a linker command file (C6713.cmd), and an ASM file containing the necessary interrupt vectors (vectors.asm). You can download these files now and add them to the project in a later step.
- The source code stereoloop.c is a template that you can use for the projects in ECE4703. This code sets up the AIC23 codec at a particular sampling rate, sets up an interrupt service routine to handle new samples from the AIC codec as they arrive, and then simply reads in and writes out samples from/to the AIC23 codec.
- The linker command file C6713.cmd tells CCS where to put your program, data, and other things like interrupt vectors, in the DSP's memory space. This linker command file is different from the one that CCS v5 gives you by default. This linker command file includes a section for interrupt vectors and also a directive to the compiler suppress warnings about missing vendor information in the chip and board support libraries. This file should work as-is, but you can also modify it to try various options like putting the data into external RAM.
- The interrupt vector table vectors.asm contains the interrupt vectors necessary to enable interrupt-based processing of samples on the DSK.
Part 2: Create the CCS v5 project container
- These steps assume that you have correctly installed and configured CCS v5. You should be able to connect to the DSK and see something like the following window before proceeding.

- Click on "File->New->CCS Project". If this is the first time using CCS v5, you may have to click "File->New->Other" and then select CCS project. The following window should appear
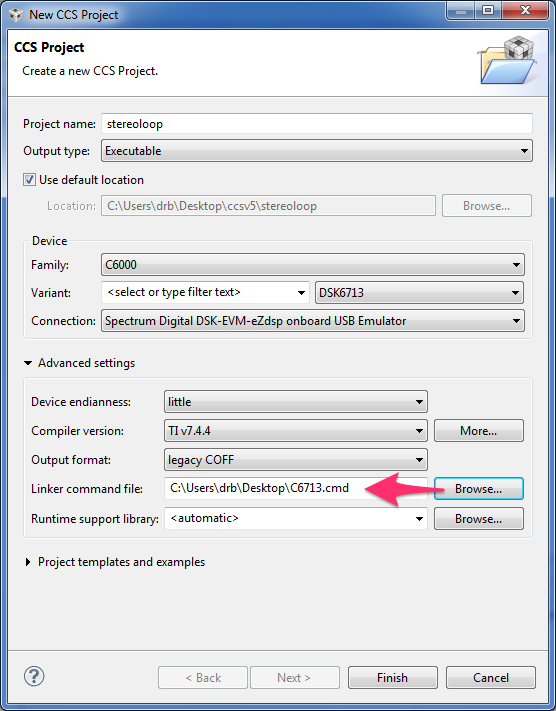
This is where you name and configure your project. Here we named the project "stereoloop", told CCS to use the default location (you may want a different location), set the device variant to DSK6713 and told CCS how to connect to it (this is very important). We've also opened the advanced settings and told CCS to use our C6713.cmd linker command file (if you miss this step, you can always replace the linker command file later).
-
Under project templates and examples, select "Empty Project" and then click "Finish".

-
This is what it should look like after you've set up the project container.

You might have some other panels visible, but the Project Explorer panel should show the stereoloop project as "Active" and should show the C6713.cmd file.
Part 3: Add source code to your project
- So far, we just have an empty project container with no code. Now you can copy or move stereoloop.c and vectors.asm into your project directory:

CCS v5 will automatically add these files to your project.
- Here is what CCS v5 should look like after it recognizes that you moved the two source files into the project directory.

Note the presence of stereoloop.c and vectors.asm active stereoloop project.
Part 4: Tell CCS v5 where to find the necessary header files and libraries
- If we try to build the project now, we will get some errors because (among other things) CCS v5 doesn't know how to find the CSL and BSL header files and libraries. We'll first tell CCS v5 where to find the header files. Click on "Project->Properties". Drill down to "Build / C6000 Compiler / Include Options" in the left sidebar:
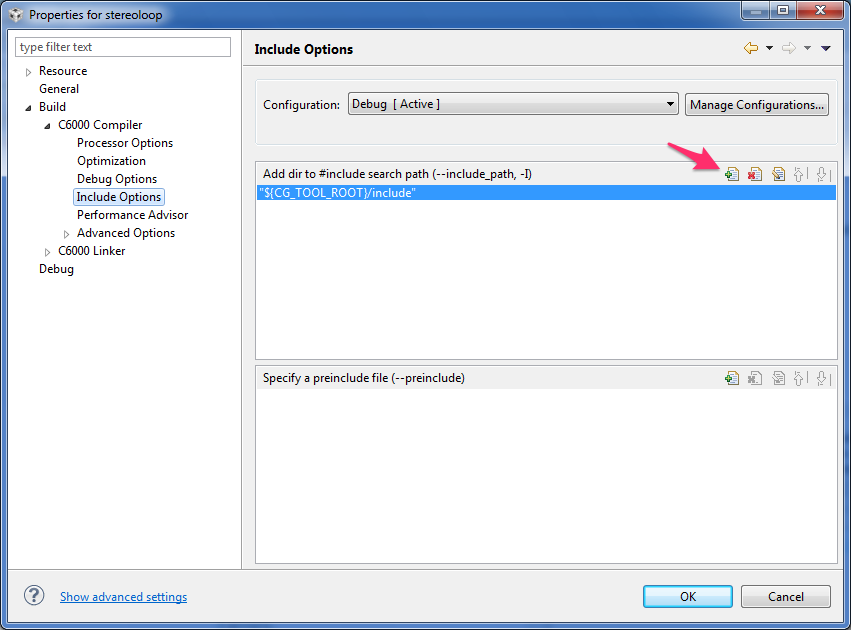
This is where we will configure CCS v5 to find the appropriate header files.
Note that we can add directories to the #include search path here by pressing the button with the green plus sign.
- Press the button with the green plus sign to add the CSL header file directory

Usually, the CSL header files are in C:\Program Files\Texas Instruments\C6xCSL\include. Click "OK".
- Press the button with the green plus sign to add the BSL header file directory

Usually, the BSL header files are in C:\Program Files\Texas Instruments\DSK6713\c6000\dsk6713\include. Click "OK".
- Your properties window should now look like this.

Note the two directories that we added to the #include search path.
- We now need to tell CCS v5 to include the CSL and BSL library files in the project. Drill down to "Build / C6000 Linker / File Search Path" in the left sidebar:
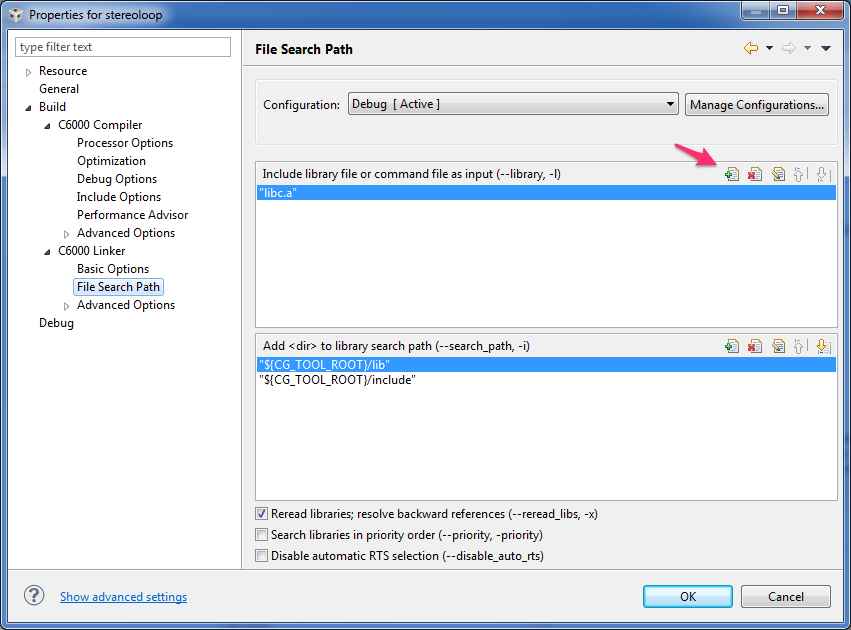
Note that we can include library files directly in the project by pressing the button with the green plus sign.
- Press the button with the green plus sign to add the CSL library

Usually, the CSL library is in C:\Program Files\Texas Instruments\C6xCSL\lib_3x\csl6713.lib. Click "OK".
- Press the button with the green plus sign to add the BSL library

Usually, the BSL library is in C:\Program Files\Texas Instruments\DSK6713\c6000\dsk6713\lib\dsk6713bsl.lib. Click "OK".
- Your properties window should now look like this.

Note the two libraries that we added to the project.
Part 5: Tell CCS what to use for stack and heap sizes
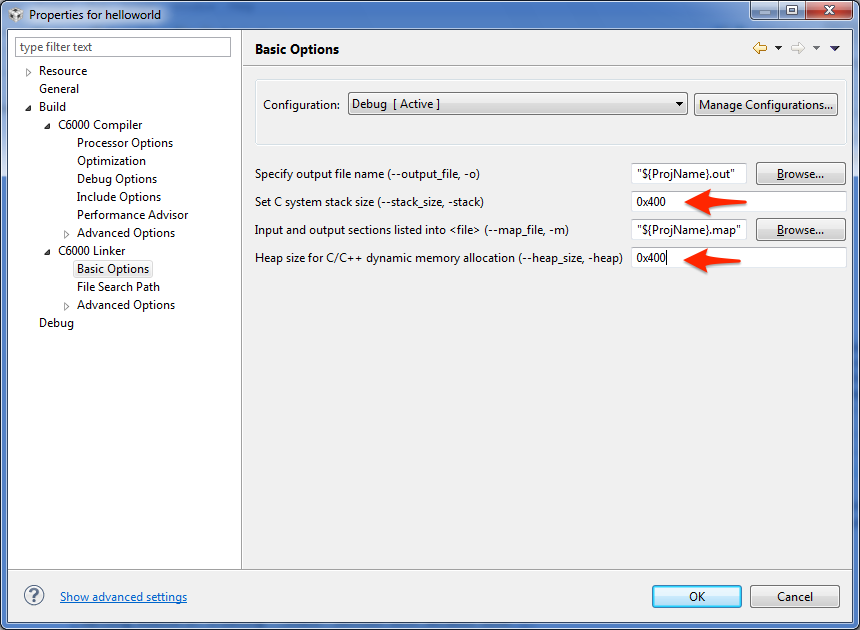
- You could now compile the project, but you would get some warnings about not explicitly setting the stack and heap sizes (CCS v5 will just go with some default values). We would like to get rid of these warnings. To do this, drill down to "Build / C6000 Linker / Basic Options" in the left sidebar and put in values of 0x400 for stack size and 0x400 for heap size (these should be fine for ECE4703 projects).
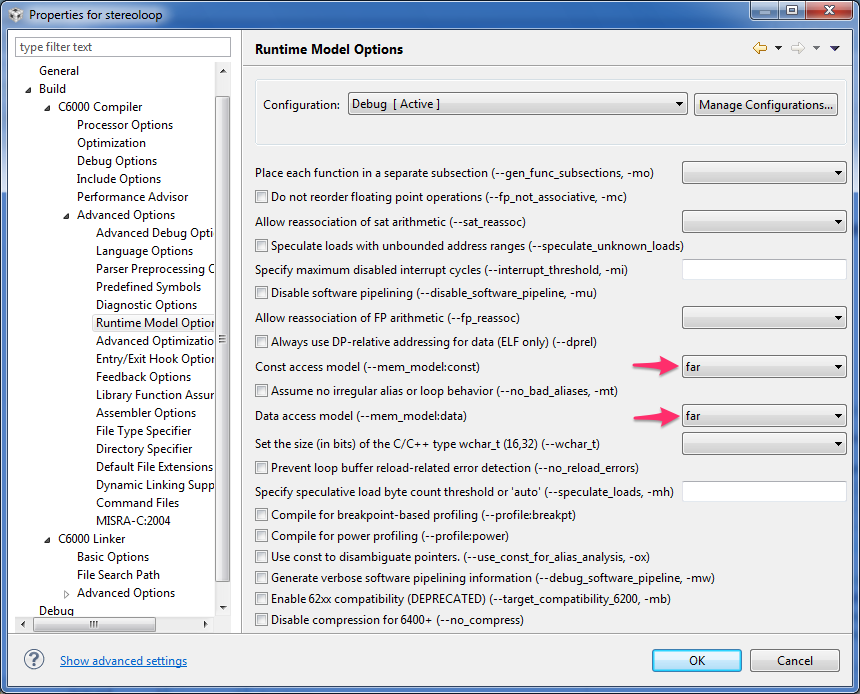
Part 6: Tell CCS to use a "far" memory model
- There is still one more thing to fix before CCS v5 will cleanly compile the project. Drill down to "Build / C6000 Compiler / Advanced Options / Runtime Model Options" in the left sidebar and set the "Constant access model" and "Data access model" both to "Far":
Part 7: Tell CCS we are using a 6713 chip
- While the project will compile with the current settings, the compiler will not use instructions
optimized for the TMS320C6713 chip unless we tell it to do so. Drill down to "Build / C6000 Compiler / Processor Options" in the left sidebar and set the "Target processor version" to "6713" (no quotes):

Now click "OK".
Part 8: Build and run the project
- If you've followed all of the steps above, you should be able to build the project without errors or warnings. Click on the hammer button or "Project->Build All". You should see something like this:

- Now click the green bug icon (this launches the debugger). This will cause the executable output of the build to be loaded onto the DSK and put the instruction pointer of the DSP at the start of your code. You may be asked to terminate an existing debug session. If so, click "Yes". You may also see some USB enumeration as CCS connects with the DSK. After a few seconds, you should see something like this upon entering the debugger:

In the Debug window, press the Run/Resume button. Any music played into the line-in input of the DSK will be passed through to the line-out and headphone outputs. Try it. You can halt the code anytime by pressing the Suspend button (looks like pause). When the DSP is running, you should hear music. When the DSP is halted, you should not hear music.
- Congratulations. At this point, you have a template that you can use for the remaining assignments in ECE4703.


