Part 1: Create the CCS v5 project from the hello world template
- These steps assume that you have correctly installed and configured CCS v5. You should be able to launch the DSK6713 target configuration and connect to the DSK. After connecting to the DSK, you should see something like the following window:

Make sure this works before proceeding.
- Click on "File->New->CCS Project". If this is the first time using CCS v5, you may have to click "File->New->Other" and then select CCS project. A window like the this should appear:

This is where you name and configure your project. Here we named the project "helloworld", told CCS to use the default location (you may want a different location), set the device variant to DSK6713 and told CCS how to connect to it (this is very important), and then selected the "Hello World" project example. After these options are specified, click "Finish".
-
You should now see something like this:

You might have some other panels visible, but the C/C++ Projects panel should show the helloworld project as "Active" and you should see the hello.c file.
Part 2: Build and run the project
- If you've followed all of the steps above, you should be able to build the project and run it on the DSK. Click on the hammer icon (or "Project->Build All"). You should see something like this:

Note that the project built but there are a couple warnings.
-
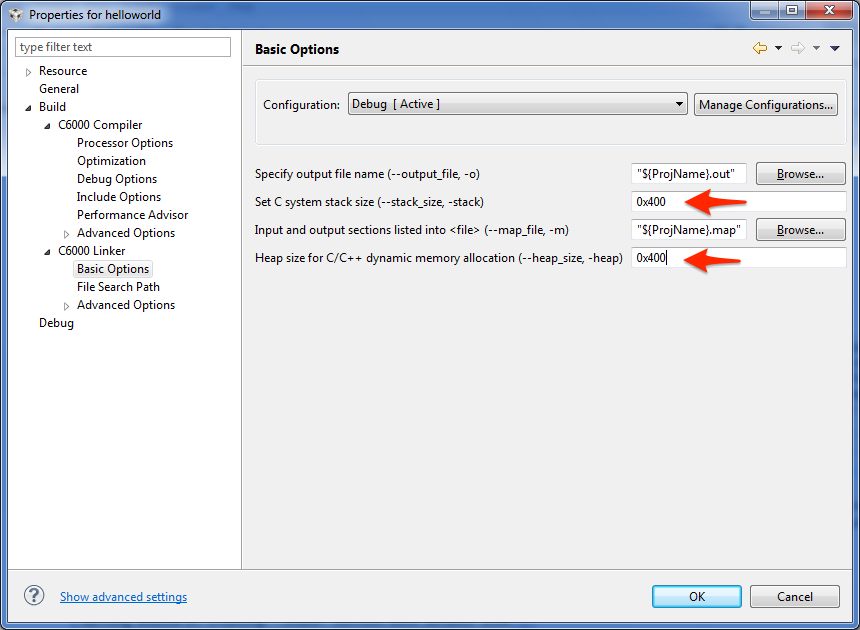
If you get some warnings about the stack and heap sizes, select the helloworld project (so that it is "Active"), click "Project->Properties", and expand the "C/C++ Build" section in the left sidebar. Expand the "C6000 Linker" subsection and select "Basic Options". Put in values of 0x400 for stack size and 0x400 for heap size (these should be fine for ECE4703 projects). Click "OK".

You should be able to compile the helloworld project with no warnings now.
- Now click the green bug icon (this launches the debugger). This will cause the executable output of the build to be loaded onto the DSK and put the instruction pointer of the DSP at the start of your code. You may be asked to terminate an existing debug session. If so, click "Yes". You may also see some USB enumeration as CCS connects with the DSK. After a few seconds, you should see something like this upon entering the debugger:

-
In the Debug window, press the Run/Resume button (the button with the yellow rectangle and green triangle). The code should run, some LEDs should flicker on the DSK, and you should see "Hello World" in the console.

You can easily run the code again by clicking on the Restart button (which puts the program counter back at the beginning of the code) and then pressing the Run/Resume button again.
-
Congratulations. You've successfully built and run a project on the TMS320C6713 DSK.


